AF here and some people on Facebook Mordheim Group asked for a Grimdark Witch Hunters painting tutorial. I had some time during the holidays, so I processed the step-by-step photos of Witch Hunter Captain I've painted recently and prepared what's below. Enjoy.
Ludzie na mordheimowej grupie na fejsie pytali o przepis na bladych witch hunterów. Korzystając z wolnego w trakcie przerwy świątecznej, opisałem zdjęcia kapitana łowców czarownic robione w trakcie jego malowania. Efekt poniżej. Jest po angielsku, żeby nie puchło od nadmiaru tekstu. Wierzę, że dacie radę :D
Underpainting
Because I'm aiming for dark and pale colors, I am starting with black-to-dark-grey zenithal:
- I prime the mini black using Citadel Chaos Black Spray.
- When it cures, I spray the mini with Citadel Mechanicus Standard Grey from a 45-degree angle.
- When it's dry, I drybrush the mini from up to down with Vallejo Model Color Blue Pale Grey.
- Finally, I wash it with Two Thin Coats Oblivion Black Wash (In my opinion it's the closest to the old Citadel Nuln Oil).
Paints and techniques used
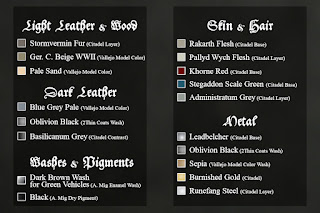
Here's the list of paints I used. I put the name of the manufacturer and the line the paint comes from in brackets after the name of the paint. For layering, highlighting, edge highlighting, and stippling with scratchy lines I put the paints on a wet palette and paint with many thin coats. If a mix of paints seems too vibrant, I tone it down with Citadel Eshin Grey or Corvus Black. For stippling - the main technique I use to get fabrics and light leather texture - I use a dry palette and an old brush. When I'm using the brightest colors and it needs to be more precise, I switch to a fine brush and put the dots exactly where I want them. The dry palette comes in handy for washes and contrast paints as well.
I try to mimic the texture of materials with the way I paint them:
- when painting leather, I stipple the elevated areas with dots or scratchy lines;
- when painting fabrics, I stipple with dots;
- when painting metal, I use metallic paints in places where the light would reflect off;
- when painting wood, I build up layers of thin lines.
It helps to differentiate the surfaces even though the colors used to paint them are often similar. Additionally, before priming the mini I add some texture (using Mordant Earth and Typhus Corrosion Citadel Technical Paints) to the bottom sections of the coat.
Grimdark Witch Hunter Step-by-Step Painting Tutorial
Stippling here and in the next step doesn't have to be precise.
At this stage I use an old brush with a little paint (similarly to drybrushing) for it.
At this stage I use an old brush with a little paint (similarly to drybrushing) for it.
At this stage I want my stippling dots to go where I want them,
so I switch from an old brush to a pointy one.
so I switch from an old brush to a pointy one.
Before applying the enamel wash, I wait for the acrylics to cure completely.
I fix pigment with vodka. It doesn't change color of the pigment,
doesn't activate cured paints and let the pigment blend-in well.
doesn't activate cured paints and let the pigment blend-in well.

.jpg)


Hey ! Great many thanks for this, it's both very detailed, throughout and easy to follow!
OdpowiedzUsuńI was not aware of either stipling or dot stipling as techniques - I've been struggling with too thick or broad layers - eager to try this out!
Adding texture to the lower part of the mini is another thing I have to try! Happy new year and again a big thank you for sharing your talent !
If you planning to start a patreon- let us know :)
I'm glad you find it easy to follow :)
UsuńI think that stippling/dotwork is a legit painting technique. In the miniature painting world there is a guy named Richard Grey (@daemonrich). He's an absolute master of it. Check out his YouTube and be amazed, what lots of tiny dots and lines can do: https://www.youtube.com/@demonrich
Good luck on your stippling and texturing adventures and happy new year!
podsumowanie karnawału i link do następnego o tu: https://blog.bostonsteelworkspolska.com/2024/01/figurowy-karnawa-blogowy-edycja-112.html
OdpowiedzUsuńDzięki za poprowadzenie 112. edycji i meldunek :)
UsuńFajny ten szef. Mrok mu pasuje ;)
OdpowiedzUsuńKomu w Mordheim nie pasuje!? :D Dzięki!
UsuńRzetelny i staranny tutorial - uznanie i podziękowanie za przygotowanie!
OdpowiedzUsuńPozwolę sobie zrobić zrzut do PDFa i umieścić w folderze hobbystycznym poświęconym malowaniu.
P.S. Podoba mi się, że używasz wódki jako medium malarskiego :D.
Za sprawą Gardens of Hecate (bardzo polecam! link niżej) nabrałem przeświadczenia, że tutoriale mogą mieć wartość estetyczną. Odkąd podpatrzyłem, to rzeczywiście się przy tych moich staram :D Cieszę się, że rzecz wydała się przydatna. Niech .pdf służy :)
UsuńNie jestem pewien, jak wpadłem na tę wódkę :P Poczytałem chyba przy okazji olejnych washy o White Spiricie jako rozpuszczalniku. I - choć wiem, że chemicznie to jednemu do drugiego niezbyt blisko - przez semantyczne skojarzenie spróbowałem wódy z pigmentami. Siadło. Ładnie zgania w zagłębienia, ale jednak dość dużo zostawia na powierzchni; do tego nie przyciemnia (a miałem takie doświadczenia z Pigment Fixerem) i wychodzi taniej niż Odourless Thinner. Wódkę serdecznie polecam :P
Wspomniany link: https://gardensofhecate.com/tutorials/